Using the tips provided in this write-up, you can free up hard drive space for important files and programs by getting rid of the junk that’s taking up space with the best duplicate photo cleaner and various other Windows integrated tools.
We always find a way to fill our laptops and desktops with games, apps, videos, pictures, and documents. Unfortunately, these files slow down the system, make it hard to save files, and cause many other problems. On your Windows 10 PC, you can do many things to make your computer run faster and make more space. This article will provide you with some quick tricks that you can use to free up a lot of storage space.
Tips To Clean Your PC’s Hard Drive
Table of Contents
It does not matter how big your storage space is, a time will come when you will run out of space to store your data. Following these tips will help you clean your disk up to a limit. If you still need more space, you may need to add a second hard drive or replace your current drive with one that has more storage space.
Empty The Recycle Bin
When you remove things from your computer, like files, photos, etc., they don’t go right away. Instead, they stay in the Recycle Bin and keep taking up space on your hard drive. To empty the Recycle Bin, follow these steps:
Step1: On your Desktop, click on the Recycle Bin icon
Step2: In recycle bin, select the files you want to delete and right-click on any one of them

Step3: After right-clicking, click on Delete. Your system will ask you whether you want to delete the files permanently or not. Click on YES to proceed.

Now, all the unwanted files which were already deleted from your system will no longer take up your hard disk’s space.
Disk Cleanup
Windows has a built-in disc cleanup tool called “Disk Cleanup.” This tool can help you free up space by deleting different files. It includes temporary files, system error memory dump files, and other files. It even gets rid of any old Windows installations that might still be around.
Follow the steps below to learn how to use this tool:
Step1: Open My Computer from your desktop.
Step2: In the My Computer window, Right-click on the drive which you want to clean and click on Properties

Step3: When you click on Properties, a pop-up window will appear. Select General from the above options.
Step4: Under the General option, click on the Disk Cleanup button

Step5: Select the files you want to delete and click on OK.

Now, all the temporary files will get deleted, and you will have some additional space to store new data.
Remove Junk Files Using Storage Sense
In Storage Sense, you can remove different types of junk or temporary files to make some space on the primary as well as on secondary drives so you can store more things on them. This way, you can also make the drives run more efficiently.
Even though you can use Storage Sense on your own, you can set the feature to run maintenance automatically so that you don’t run out of space quickly.
The steps to turn on Storage Sense on Windows 10 are shown here:
Step1: Open your computer Settings
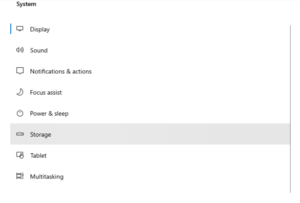
Step2: In the setting’s window, click on System

Step3: Then click on the Storage option

Step4: Click on the “Configure Storage Sense or run it now” option in the storage section.
Step5: Switch the toggle to ON

Step6: Choose the best option from the “Run Storage Sense” dropdown menu

Once you finish the steps given above, Storage Sense will automatically clean junk files and free up space as per the scheduled time.
Use Third-Party Applications To Clean Your Hard Disk
It takes up a lot of space on your computer if you have duplicate copies of the same picture. This is why it’s best to get rid of these photos and improve the speed of your computer at all times. It’s possible to use a program to look for duplicate files on your hard drive. These files aren’t needed and can be thrown away.
With the help of these third-party apps, you can make the process very simple. Here are the best duplicate photo cleaning programs to help you get rid of extra copies of your photos:
- Quick Photo Finder (Compatible with Windows 7, 8, 8.1 & 10)
- Duplicate Photo Finder (Compatible with Windows 7, 8 & 10)
- Duplicate Photo Cleaner (Compatible with Windows XP, Vista, 7, 8 &10 and MacOS 10.14 & MacOS 10.6)
- Awesome Duplicate Photo Finder (Compatible with Windows 2000, XP, 2003, Vista, 7, 8 & 10)
- VisiPics (Compatible with Windows 2000, XP, 2003, Vista, 7, 8 & 10)
These are the best picture finder and cleaner applications in the market. You can use these to get rid of similar as well as duplicate images from your PC with a single click. There are also paid programmes that have better interfaces and more features to help you find and delete duplicate files.
Use External Storage Devices
If the computer still does not have enough space, you can add an external drive to move files over the new location. You can even configure the system to make the external storage the default location to save files.
Connect the external drive you want to use to your computer. Then, follow these steps to move your old files:
Step1: When you open File Explorer, you can see all of your files.
Step2: Browse to the folder that takes up the most space and click on it to see what is there.
Step3: Select the things you want to move.
Step4: Click the “Home” button.

Step5: To choose a location, click on the Choose location button. Select the external storage as the new place to store your files.
Note: If you want to keep your files organised, you can use the available option to make a new folder to store the files in the new place.
Step6: Right-click it and choose “Move.”

After you finish the steps, you may need to do them again to move more files and folders to a new location to save space on the drive that is running out of space.
Conclusion
The tips mentioned above will help you delete large and unnecessary files and folders to free some space on your hard disk. Make it a practice to use these tips regularly so that you would not face any ‘not enough space’ warnings in the future. You can also format your computer, but it is a bit technical and complex process. We hope you find these tips helpful. Please share your thoughts on this article in the comment section.


